As if all the STUFF going on in the world weren't enough.
The coronavirus is starting to surge again, and things like toilet paper, paper towels, and cleaning supplies are becoming scarce, and my foraging trips are getting longer and longer. Protests over social justice have been ongoing for over two months now and the social media are uglier and uglier. The church denomination I belong to is getting ready to split, and I'm not sure what I'm going to do about that. The economy is unsettled. There is so much uncertainty in all facets of life that we're all kind of walking on the edge.
So I've had a frustrating week. After days of rain, the weather has finally cleared up, but then That Man and I had a "discussion" about the financials of removing the buckeye tree that snapped off. And the next day, his cell phone bit the dust - the battery wouldn't hold a charge more than a couple of hours on standby, and it's a phone with a battery that couldn't be replaced, of course. He's been back at work for nearly three weeks, and working third shift, he sleeps during the day so I was left with the fabulous job of securing a new phone. When That Girl was here at the beginning of July, we drove to the Verizon store where she stood in line outside and waited her turn to buy a new phone. It took some time, but she got it done.
Well, things have changed since then!
You can't just show up and buy a phone anymore. I had to go online, figure out what phones were acceptable, then figure out what phones were actually available nearby (he wanted it ASAP), then order one and pick it up curbside.
Easy, right?
Well, it SHOULD have been, but...! When I'd click on a specific phone, a different one would come up. When I finally got a phone and a case into the online shopping cart and agreed to this that and the other, I clicked on "Proceed to Secure Checkout," and wound up on the same page. I checked and checked, but I hadn't missed filling in any fields or checking any boxes. So how come I couldn't Proceed to the Secure Checkout?
I started working on this project at 9:00 in the morning. By noon, I hadn't been able to even get a phone into the cart! I was working on a laptop, and I was to the point of pounding the keyboard with my fist (NOT my typical solution to computer troubles) and almost throwing it across the room and against the wall. I was so frustrated and angry I couldn't stop tears from coming.
Finally, I gave up and called Verizon. The nice lady on the phone said three-quarters of the calls she'd gotten that day were about trouble with the website. She placed my order and we crossed our fingers - it went through!
The hard part was over! HA.
In about an hour, the email arrived - come get the phone. I drove to the store, got the phone, drove home, and started activating the beast. During the activation, you can copy your setting and apps just by having the old phone and the new phone next to each other. Things were going according to plan, but then the new phone tried to pull the settings and apps from MY phone! GREAT. More frustration and tears until I figured out how to back out of the activation mode and start over.
When it was all over, it was 5:00, and I was mentally and emotionally exhausted. The next day, I felt like I had a hangover! I was completely worthless.
So why did it affect me so strongly?
Well, like I said at the beginning of this post, we're all walking on the edge. The stress that's become the white-noise background of our lives and keeps us on the edge. I'd found a precarious balance on the tightrope, and the phone fiasco was just enough to push me over that edge.
Oh, it was definitely annoying and way too time consuming, but was it something to cry over? No, but when you're overwhelmed,something's gotta give, and it did.
Friday, July 31, 2020
Monday, July 27, 2020
The Mid-Summer Yard and Garden Tour - Something's Growing! (Part 2)

 The garden, which had an inauspicious start and was so sparse just a few weeks ago, is starting to really look like something's happening! The peppers are peppering and the tomatoes are tomato-ing!
The garden has nearly exploded with growth! There are tomatoes and peppers all over the plants. I'm looking forward to the harvest!


Friday, July 24, 2020
An Experiment with My Phone - the BirdNET App (Identify Bird Songs with Your Phone!)
I downloaded an app several weeks ago, but never tried it out until today. I do all right identifying birds when I SEE them, but I'm not very good at identifying their songs, so when I saw this app reviewed in a magazine, I decided to download it.
Wednesday I sat out on my front porch and opened the app on my phone and let it listen to the sounds around me. It shows a spectrogram of the sounds it detects. You select a section of the spectrogram to be analyzed, and in a few seconds, if the sound was clear enough, you get a result, with the degree of certainty of the result. Here are four examples from Wednesday morning. I circled the trace of each birdsong in blue.

 The first one is a goldfinch. It's kind of faint, but you can see the fluid song repeating. The second is a downy woodpecker, making short sharp sounds. The third is a house finch with a fluid, random song. The fourth is a cardinal, and you can see its chirp chirp chirp chirp chirp chirp chirp on the spectrogram.

 The birds the app identified Wednesday morning included those four plus a cedar waxwing, a pileated woodpecker, an eastern meadowlark, a chipping sparrow, a tufted titmouse, a blue-gray gnatcatcher, a brown-headed cowbird, and a Carolina chickadee, all birds I've seen in our yard.
After just a very short time, I was able to guess what bird was sounding off before having the app analyze the song, at least for the more vocal birdies - the cardinal, goldfinch, and chipping sparrow.
Kind of a fun experiment, and the app really does what it says it will! If it works that well on my front porch with cars driving by and making lots of background noise, I'm looking forward to taking it someplace quiet.
Wednesday I sat out on my front porch and opened the app on my phone and let it listen to the sounds around me. It shows a spectrogram of the sounds it detects. You select a section of the spectrogram to be analyzed, and in a few seconds, if the sound was clear enough, you get a result, with the degree of certainty of the result. Here are four examples from Wednesday morning. I circled the trace of each birdsong in blue.

 The first one is a goldfinch. It's kind of faint, but you can see the fluid song repeating. The second is a downy woodpecker, making short sharp sounds. The third is a house finch with a fluid, random song. The fourth is a cardinal, and you can see its chirp chirp chirp chirp chirp chirp chirp on the spectrogram.
 The birds the app identified Wednesday morning included those four plus a cedar waxwing, a pileated woodpecker, an eastern meadowlark, a chipping sparrow, a tufted titmouse, a blue-gray gnatcatcher, a brown-headed cowbird, and a Carolina chickadee, all birds I've seen in our yard.
After just a very short time, I was able to guess what bird was sounding off before having the app analyze the song, at least for the more vocal birdies - the cardinal, goldfinch, and chipping sparrow.
Kind of a fun experiment, and the app really does what it says it will! If it works that well on my front porch with cars driving by and making lots of background noise, I'm looking forward to taking it someplace quiet.
Wednesday, July 22, 2020
Double Dutch Chocolate Bundt Cake (from Mom's Recipe Card File)
This has to be my favorite chocolate cake recipe of all time. It's rich and moist, but not cloying. It's fantastic with vanilla ice cream. It's really EASY!!!
This is an "old" recipe from the late 1960s or early 1970s. My version uses ready-to-spread frosting, which when we first made this recipe wasn't a thing! We had to buy a boxed frosting MIX (how convenient!) and make it before starting the cake.
 Double Dutch Chocolate Bundt Cake
It's called Double Dutch because either the cake mix or the frosting mix was called Double Dutch. You can't find it anymore, so I get as close as possible with fudge and dark chocolate. Make sure you use a good quality non-stick Bundt pan (Nordic Ware and Wilton both make good ones, but I prefer Nordic Ware).
 Double Dutch Chocolate Bundt Cake
1 package dark chocolate or fudge cake mix
1 can dark chocolate or fudge ready-to-spread frosting (divided)
3 eggs
1 1/3 c water
Preheat oven to 350 degrees. Mix together cake mix, 1 cup of the frosting, eggs, and water. Bake in a sprayed Bundt pan for 50 to 60 minutes. Cool 15 minutes, then remove from the pan. Add a little water to the remaining frosting and mix to make a glaze. Drizzle glaze over the cake.
Monday, July 20, 2020
The Mid-Summer Yard and Garden Tour - Something's Growing!
I've spent a LOT of time outside this past week, cleaning up the mess from the recent storms.
Besides the major tree damage to our buckeye and the neighbors' maple last week, some good-sized branches broke off and fell out of the top of the 95-foot tulip poplar in the back yard. The tree guys didn't mess with them because the branches didn't fall on the neighbors' house, which was why we called them and their giant claw machine.
I went out and dragged the branches to a relatively convenient spot to cut them up. We have two gas-powered chainsaws, but they're difficult to start and to keep running (even That Man has to work hard at it). They make oily messes and are LOUD to boot, so I made the executive decision to buy an electric chainsaw so I could cut up those limbs without a lot of wasted effort. It's been too hot to suffer that way. The new saw is easy to start, relatively quiet, and went through the fresh wood like butter. Because the chainsaw doesn't belch smoke and fumes, I could smell the wood as I cut. Tulip poplar is super fragrant!
About a week before the storm, I'd taken delivery of a nice new EMPTY firewood rack. Well, it's not empty anymore. That Man says that's what caused the storm to knock down the trees - nature abhors a vacuum, and the wood rack needed something to fill it up. My new chainsaw and I obliged.
I heard the storm that caused all the damage may have actually been a tornado that didn't touch down. I saw the trees on the street behind us blowing in all directions rather than just one, and our buckeye tree appeared to have been twisted when it broke. The tree guys took it down to the ground and hauled it away with the neighbors' big maple tree, so we didn't get any of its wood. Poor tree. We'll miss it.
Besides the major tree damage to our buckeye and the neighbors' maple last week, some good-sized branches broke off and fell out of the top of the 95-foot tulip poplar in the back yard. The tree guys didn't mess with them because the branches didn't fall on the neighbors' house, which was why we called them and their giant claw machine.
I went out and dragged the branches to a relatively convenient spot to cut them up. We have two gas-powered chainsaws, but they're difficult to start and to keep running (even That Man has to work hard at it). They make oily messes and are LOUD to boot, so I made the executive decision to buy an electric chainsaw so I could cut up those limbs without a lot of wasted effort. It's been too hot to suffer that way. The new saw is easy to start, relatively quiet, and went through the fresh wood like butter. Because the chainsaw doesn't belch smoke and fumes, I could smell the wood as I cut. Tulip poplar is super fragrant!
 |
| All tulip tree stuff. Under the rack is a pile of tulip poplar seeds. Dry, they make great tinder for starting a fire! |
I heard the storm that caused all the damage may have actually been a tornado that didn't touch down. I saw the trees on the street behind us blowing in all directions rather than just one, and our buckeye tree appeared to have been twisted when it broke. The tree guys took it down to the ground and hauled it away with the neighbors' big maple tree, so we didn't get any of its wood. Poor tree. We'll miss it.
 |
| Here's what a Nut Weasel looks like. |
Buckeye trees are notorious for their fertility. Every year they produce thousands of buckeyes that litter the ground and make it difficult to walk - kind of like walking on a carpet of golf balls. We used to pay The Girl and The Boy five cents a buckeye to pick them up. They'd usually fill up a couple of five-gallon buckets each at about $40.00 a bucket. That's a lot of buckeyes!
Since there aren't any kids to bribe to gather buckeyes anymore, I looked for a tool to make gathering them easier. I'd decided to buy a Nut Weasel for this fall, but now it's moot - I don't need it.
 |
| Possibly the last living connection to our buckeye tree. |
It's not just the buckeyes themselves that are problematic, but the little seedlings they make!!! In the spring, there'd be a sea of baby buckeye trees. The ones in the yard were easy to take care of - you just kept mowing the grass regularly and eventually they give up, but there would always be a bunch hiding in the beds of peonies and daylilies along the side of the house. I must have done a thorough job of eradicating the stray seedlings that usually crop up in the flower beds because there just aren't any to be found there. HOWEVER...! I discovered ONE in the grass under the tulip tree. It's apparently the only remaining offspring of our late lamented tree.
So... I've decided to dig it up and move it to the garden, and maybe one day we'll have a sapling to plant in the yard, and it will grow up and make thousands of buckeyes of its own. THEN I'll buy myself a Nut Weasel!
Friday, July 17, 2020
An Instant Pot Experiment - Hard-Cooked Eggs!
I've been using my Instant Pot for a while now, but I'm no expert! I do ribs, roast beef, chicken breasts - nothing exciting but I have several things I want to try, so I keep experimenting.
One of the first things many people try is hard-cooked eggs. They say it's fast, brainless, consistent, and the eggs are always easy to peel. Boiling eggs on the stove always worked fine for me - until I started buying super-fresh organic eggs from my church's chickens.
There are several tricks to make sure they peel relatively easily, but what a pain to jump through those stupid hoops, and which ones to use? Don't try to hard-cook them until they're at least 3 or 4 weeks old; add salt to the water; add baking soda to the water; add vinegar to the water; bring the water to a boil before putting the eggs in; put the eggs in the water before heating it up. It's enough to drive you nuts!!!
An experiment was in order!
I got out the Instant Pot and six eggs - three white jumbo, and three brown of assorted sizes. According to many sites on the internet, the standard method for hard cooking eggs in the Instant Pot is 5-5-5, which means you set the pot to cook at pressure for 5 minutes, let the pressure release naturally for 5 minutes, then open the pressure valve to release the rest of the pressure, remove the eggs and place them in ice water for 5 minutes.

That was what I'd INTENDED to do, but I got distracted during the second 5 - the natural pressure release - and so it ended up as 9 minutes instead. Well, I keep my refrigerator just above freezing because I like my drinks COLD and I want to keep the food in there fresh as long as possible, so I figured I didn't goof up too much.
When I opened the IP, one of the organic brown eggs had cracked, but unlike a cracked egg in boiling water, the white hadn't oozed out and made an ugly egg. Rather, the egg was still egg-shaped, but with just a little ridge where the shell had cracked, and half of the shell slipped off when I put it into the ice water bath.
After 5 minutes in the ice water, I pulled out one of each kind of egg and peeled them - perfectly! No special procedures - just cracked them, rolled them on the counter, and peeled from the larger end. The brown egg peeled as cleanly as the white egg.
But did I overcook them? Here's the picture - perfection! I guess I'm ready to make deviled eggs - YUM!!!
So here's the official procedure:
One of the first things many people try is hard-cooked eggs. They say it's fast, brainless, consistent, and the eggs are always easy to peel. Boiling eggs on the stove always worked fine for me - until I started buying super-fresh organic eggs from my church's chickens.
There are several tricks to make sure they peel relatively easily, but what a pain to jump through those stupid hoops, and which ones to use? Don't try to hard-cook them until they're at least 3 or 4 weeks old; add salt to the water; add baking soda to the water; add vinegar to the water; bring the water to a boil before putting the eggs in; put the eggs in the water before heating it up. It's enough to drive you nuts!!!
An experiment was in order!
I got out the Instant Pot and six eggs - three white jumbo, and three brown of assorted sizes. According to many sites on the internet, the standard method for hard cooking eggs in the Instant Pot is 5-5-5, which means you set the pot to cook at pressure for 5 minutes, let the pressure release naturally for 5 minutes, then open the pressure valve to release the rest of the pressure, remove the eggs and place them in ice water for 5 minutes.

That was what I'd INTENDED to do, but I got distracted during the second 5 - the natural pressure release - and so it ended up as 9 minutes instead. Well, I keep my refrigerator just above freezing because I like my drinks COLD and I want to keep the food in there fresh as long as possible, so I figured I didn't goof up too much.
When I opened the IP, one of the organic brown eggs had cracked, but unlike a cracked egg in boiling water, the white hadn't oozed out and made an ugly egg. Rather, the egg was still egg-shaped, but with just a little ridge where the shell had cracked, and half of the shell slipped off when I put it into the ice water bath.
After 5 minutes in the ice water, I pulled out one of each kind of egg and peeled them - perfectly! No special procedures - just cracked them, rolled them on the counter, and peeled from the larger end. The brown egg peeled as cleanly as the white egg.
But did I overcook them? Here's the picture - perfection! I guess I'm ready to make deviled eggs - YUM!!!
 |
| Notice how yellow the organic egg yolk is compared to the white egg's! |
Hard-Cooked Eggs in the Instant Pot (Basic 5-5-5 Method)
Eggs (whatever number you want to cook)
Water (the minimum amount required by your Instant Pot - 1 1/2 c for a 6-quart, 2 c for an 8-quart)
Pour the water into the inner pot. Place a trivet or steamer basket inside the inner pot. Stack the eggs on the trivet or in the steamer basket. Close the lid, set the pressure release valve to sealing.
Press the Pressure Cook button, making sure the pressure is set to "High." Set the cook time to 5 minutes. The Instant Pot will beep and start heating up. Prepare an ice water bath for cooling the eggs after they have finished cooking. When it gets up to pressure, the Instant Pot will beep again and start counting down.
When the cooking time is finished, the Instant Pot will beep again and start counting up. When it reaches 5 minutes, turn the pressure release valve to "Venting." When the pressure has completely released, open the Instant Pot lid, remove the eggs and put them in the ice bath for 5 minutes.
Wednesday, July 15, 2020
Quick Boston Baked Beans (from Mom's Recipe Card File)
Mom told me eons ago that she got this recipe from a friend who was born and raised in Boston, and this is how her family made authentic Boston baked beans without soaking dried beans and all the hoo-haw that goes with it. I've taken them to all sorts of pitch-ins over the years, and everybody raves over them and wants the recipe. These are the BEST baked beans EVER.
 Quick Boston Baked Beans
2 jars (18 oz each) B&M Original Baked Beans, drained, not rinsed
1/2 c ketchup
1/4 c chopped onion
2 T dark brown sugar
1 T mustard
1 T molasses
3 slices cooked bacon, chopped
Preheat oven to 375 degrees. Mix all ingredients together and place in a sprayed baking dish. Bake at 375 degrees for 30 minutes or until bubbling and caramelized on top.
[NOTE: If you can't find B&M Baked Beans, Bush's Boston Style Baked Beans will also work. What you're looking for is navy pea beans in a brown sugar sauce. Other canned "baked beans" won't do.]
Monday, July 13, 2020
An INTERESTING Weekend - As in the Ancient Chinese Curse
 |
| The Bridgeton covered bridge. |
 |
| The Bridgeton Mill |
 |
| The Zacke Cox covered bridge. |
 |
| The Harry Evans covered bridge. |
It was a bright, clear, sunny, mild day. While I wandered the back roads of Parke county, always on the lookout for wildlife, I encountered a white-tailed deer, a bald eagle, loads of turkey vultures, and a tree full of eastern bluebirds. I ate a little snacky lunch at a picnic table by one of the bridges.
 |
| The Rosedale covered bridge. |
 |
| The Mecca covered bridge. |
Pulling into the garage, I saw our neighbor on our front porch talking to That Man. She was telling him one of our trees had split and was about to fall, and to be careful around it. Once inside, we watched the rain wind whip the trees on the street behind us into a frenzy.

 After the storm passed, we went outside to see what was what, and sure enough, our buckeye tree had been totally decapitated, the missing top on our neighbors' roof and gazebo. Plus, their big sugar maple had split and blocked the street. I called a tree service, and that's how we spent all of Sunday - supervising the removal of those two trees with our neighbors and picking up leaf litter and moving "smaller" branches around. We had several branches blown out of the top of our 90-foot tulip tree, too, and they ended up scattered around the back yard - knocking down our cable TV connection, hitting my boat, and landing on the tomato plants in my garden.

And then the cherry on the top - when we woke up Sunday, we had no power. A tree down the street had been struck by lightning Saturday, caught fire, and during a second storm that night fell and took down the power lines. We didn't get power back until nearly 5:00 Sunday afternoon.
In the meantime, we got out a generator for us and another for our neighbors so our refrigerators and freezers would stay cold. It was a mild day again, so we just opened the windows to keep from suffocating in the house. It could have been much worse - the temperature could have climbed into the 90s like it did earlier in the week.
The tree guys brought a truck with a grappling arm to remove the top of our buckeye tree from the neighbors' roof. It was fascinating to watch, as attested by the number of rubberneckers driving by, slowing down, and taking pictures, but I'd really rather not have that kind of activity in our yard again soon.


 |
| Here's the pile from the neighbors' tree, after the street had been cleared. |
 |
| Here's the pile from our buckeye tree. |
Friday, July 10, 2020
I Almost Made a Spectacle of Myself!
Well, maybe I didn't make a spectacle of myself, but I could have!
Upon getting into the car for a foraging trip, I pulled my sunglasses out of their case, unfolded them, and the left temple piece came off in my hand, while the hinge pin fell into my lap. I felt it, but I couldn't see it until I got out of the seat and searched around. The pin went back into the hinge easily, and I found a tiny screwdriver to tighten it up.
All fixed - YAY!
 The next morning I got up and started to put on my regular glasses and they BROKE right in the
center of the bridge. What the heck??? I haven't broken anything on my glasses for YEARS (1982-ish?) - so how come I've had TWO incidents in two days??? And I've only had these glasses (both of them!) since mid-September!
Thank heaven I still have my old glasses to wear and the broken glasses were covered by a protection plan, so the frames can be replaced at no additional cost to me, but the question is will they still have the same style of frames I bought? And if not, will they have any frames that will fit my lenses? I'll find out on Monday.
I guess we will SEE what we SEE when we SEE it! Ha!
Upon getting into the car for a foraging trip, I pulled my sunglasses out of their case, unfolded them, and the left temple piece came off in my hand, while the hinge pin fell into my lap. I felt it, but I couldn't see it until I got out of the seat and searched around. The pin went back into the hinge easily, and I found a tiny screwdriver to tighten it up.
All fixed - YAY!
 The next morning I got up and started to put on my regular glasses and they BROKE right in the
 center of the bridge. What the heck??? I haven't broken anything on my glasses for YEARS (1982-ish?) - so how come I've had TWO incidents in two days??? And I've only had these glasses (both of them!) since mid-September!
Thank heaven I still have my old glasses to wear and the broken glasses were covered by a protection plan, so the frames can be replaced at no additional cost to me, but the question is will they still have the same style of frames I bought? And if not, will they have any frames that will fit my lenses? I'll find out on Monday.
I guess we will SEE what we SEE when we SEE it! Ha!
Monday, July 6, 2020
My Favorite Summer Soup - Gazpacho - A Quick and Easy Pantry Recipe
I learned about gazpacho (gahs-PAH-cho) in high school Spanish class. It's a tomato-based cold soup (stay with me, here - it's delicious!) originating in Andalusia (southern Spain) that's perfect for those hot hot hot summer days when nothing much sounds good except a plunge into a bathtub full of ice water. When I first served it to That Man, I told him to think of it as a salad, because that's basically what it is.
The original recipe I have is preprinted on a 3x5 card. I'd sent away for a packet of these recipes from Campbell's - yes, the soup people! I tried a few of them and kept a couple - one for fettuccine alfredo and this one for gazpacho. The original version makes quite a bit - just about 9 cups counting all the vegetables (which is nearly half again as much as what the recipe says it will make!), but I'll give you my cut down version first. You'll need a blender that can crush ice for my blender version.
 Quick Blender Gazpacho
1 can (10 3/4 oz) condensed tomato soup
1 c ice and water (I put crushed or cubed ice in a measuring cup, then fill it with water)
1/4 t garlic powder (or more, if you're a garlic aficionado like I am!)
1 slice bread, toasted
4 t vinegar
2 t olive oil
1/3 c chopped bell pepper (any color)
2 T chopped onion
2/3 c chopped cucumber, divided
1/3 c chopped tomato
Put everything in the blender except for half of the chopped cucumber and all the chopped tomato. Put the lid on the blender and puree until everything is well blended. By the time you serve the soup, all the ice should be melted, and the soup should be good and cold. You should be able to get 3 to 4 small bowls of soup from this recipe. Serve the soup topped with the remaining chopped cucumber and the chopped tomato. If you want, you can omit the toast and add some croutons to the toppings. although authentic gazpacho has bread in the soup. Because I use ice as part of the water, you can serve this right away, instead of having to chill it for 4 or more hours before serving.
Here's the original recipe, as printed on the card from Campbell's:
Gazpacho (soups / sauces)
2 medium cloves garlic, minced
2 tablespoons olive oil
3 cans (10 3/4 ounces each) Campbell's Tomato Soup
3 cups cold water
1/4 cup wine vinegar
2 cups chopped cucumber
1 cup chopped green pepper
1/2 cup chopped onion
Croutons
In a small saucepan, cook garlic in olive oil; combine in a large bowl with soup, water, and vinegar. Chill for 4 hours. Serve in chilled bowls. Pass chilled vegetables and croutons for garnish. Makes about 6 1/2 cups.
Blender Version: Cook garlic as above. Combine in electric blender with 1 can soup, 1 cup water, 1/4 cup cucumber, 1/4 cup green pepper, 2 tablespoons onion, and 2 slices toast. Blend until smooth; combine in a large bowl with remaining soup, water, and vinegar. Chill as above. Garnish with remaining vegetables.
TESTED RECIPE / HOME ECONOMICS DEPARTMENT / CAMPBELL SOUP COMPANY
Thursday, July 2, 2020
An Instant Pot Experiment - Yogurt!
I have an 8-quart Instant Pot Duo, which has a yogurt making program, and lots of people say it's a great way to make homemade yogurt. I remember back in the Dark Ages (the early 1980s!) having a "yogurt making kit," which consisted of 6 little containers that looked just like the little containers for commercial yogurt sold at the grocery store (they were for putting the yogurt into after it was made - duh!) and a larger (1-quart) container that again looked just like the large commercial yogurt containers in the store. The difference was, of course, no label AND the containers were even more cheaply made than the ones that commercial yogurt was sold in - really thin plastic. Plus, the large container had a color-changing "thermometer" stuck on one side, reminiscent of the old strip fever thermometers you held on your forehead for a minute to get your temperature instead of sticking a mercury thermometer under your tongue for five minutes - ooooooh! - high-tech!!!
I actually used that cheapo kit to make yogurt for several years! The problem with it was it wasn't very sturdy, you had to watch the milk boil, and it was difficult to keep it at the correct temperature so the yogurt could form.
Needless to say, it didn't hold up, so got pitched long ago, and I just started buying yogurt again.
Then along came the Instant Pot and all the reviews about how great the yogurt-making function was. Well. I just had to give it a try! The whole process took me about 19 hours, counting the minimum refrigeration time (1 hour to boil, 12 hours to ferment, and 6 hours in the fridge). I used 1% milk that was JUST at its sell-by date. It may have fermented a little quicker if I'd used newer milk, according to some articles I read later on. But it was a fun experiment and most of the time the process was hands-off. I like that!
So here's how you do it! (This is for the Instant Pot Duo; I don't know how it would work with other electric pressure cookers.) You will need an instant-read thermometer.
 Yogurt in the Instant Pot
2 quarts milk (you can actually use 1 gallon, and use the same amount of starter)
2 T starter (this isn't anything special, just PLAIN yogurt made with milk and active cultures - I used Fage Greek yogurt from the store but some people order starter online)
Put the milk into the Instant Pot insert, put the insert into the Instant Pot, and close the lid. If you use the regular lid, it doesn't matter whether it is sealed or vented. You can use a glass lid instead if you have one.
Select the Yogurt program. Press the Yogurt button repeatedly to select the "More" mode. After about 10 seconds, the cooker will beep 3 times and the display will say "boiL."
When that step is done, the cooker will beep and the display will say "Yogt." Check the temperature with a thermometer. It will probably be around 165 degrees. You really want it to reach 180 degrees, so turn on the "Saute" function, and periodically whisk it and check the temperature until it reads 180 degrees. Keep it at 180 degrees for 3 to 5 minutes, then push the "Cancel" button. If a skin forms on the top of the milk at any time during this entire process, remove it and throw it away. It won't hurt anything, but if you let it remain, it will make the yogurt's texture a little weird.
Remove the insert and place it in the sink with cold water or on a wire rack to cool. This shouldn't take long! Keep whisking and checking the temperature. You are looking for 115 to 118 degrees.
When you're at the right temperature, take about 1/2 cup of the heated milk and put it in a small bowl. Add your starter and whisk it together (this is called tempering the starter), then add it back to the rest of the heated milk and whisk to mix well.
Place the insert back into the cooker and close the lid. Again, the steam release valve can be set for either venting or sealing, or use a glass lid. Select the "Yogurt" program and adjust to Normal mode. Press the +/- to set the fermentation time to 8:00 (8 hours). You may want to check it at 4 hours, just in case it goes crazy and ferments quicker!
When the program is finished, the cooker will beep and the display will say "Yogt." To check whether it's truly finished, nudge the cooker slightly to see whether the yogurt has set. DO NOT STIR THE YOGURT AT THIS POINT!!! It should jiggle slightly as a mass, sort of like soft gelatin. There will probably be some whey (clear liquid) on top. If it hasn't set, repeat the previous step, but set the time for 4 hours, and check it every hour.
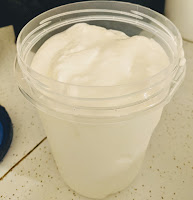
When the yogurt is set, press "Cancel," remove the insert, cover it with plastic wrap or the glass lid, and refrigerate it for at least 6 hours before you stir it. At the end of that time, you can put it into a storage container. I poured the whey off the top first and didn't strain it. It was creamy and thick.
 If you want it thicker, or want Greek yogurt, line a colander or mesh strainer with cheesecloth or a big coffee filter or a couple of layers of flour sack towels and set it over a large bowl. Spoon the yogurt into the colander and let it drain (covered, in the refrigerator) for up to 6 hours, depending on how thick you want it.
Reserve 1/4 cup of the yogurt or whey as starter for your next batch!
To eat, I added a tablespoon of raspberry preserves to about 3/4 cup of yogurt. I didn't have any fresh fruit to add, so I made do with that.
AFTERTHOUGHTS: Next time I make yogurt, I MAY use 2% milk instead. And fresher milk, too, for sure. I also MAY strain it for a short time to make it a bit thicker, but other than those two things, I wouldn't change anything. It really did come out well, and I was impressed by my first attempt. I had eight 8-ounce cups of homemade yogurt (which typically comes in 6-ounce cups in the store) for around $2.00 total (about $1.00 for the milk, which I had bought in a gallon container, and about $1.00 for a single-serve cup of Fage plain yogurt). If I had remembered (brain fade!!!) to reserve some of my yogurt to use as starter for my next batch, the cost for that new batch would only be about $1.00, since I wouldn't need to buy anything to use as starter.
I actually used that cheapo kit to make yogurt for several years! The problem with it was it wasn't very sturdy, you had to watch the milk boil, and it was difficult to keep it at the correct temperature so the yogurt could form.
Needless to say, it didn't hold up, so got pitched long ago, and I just started buying yogurt again.
Then along came the Instant Pot and all the reviews about how great the yogurt-making function was. Well. I just had to give it a try! The whole process took me about 19 hours, counting the minimum refrigeration time (1 hour to boil, 12 hours to ferment, and 6 hours in the fridge). I used 1% milk that was JUST at its sell-by date. It may have fermented a little quicker if I'd used newer milk, according to some articles I read later on. But it was a fun experiment and most of the time the process was hands-off. I like that!
So here's how you do it! (This is for the Instant Pot Duo; I don't know how it would work with other electric pressure cookers.) You will need an instant-read thermometer.
 Yogurt in the Instant Pot
2 quarts milk (you can actually use 1 gallon, and use the same amount of starter)
2 T starter (this isn't anything special, just PLAIN yogurt made with milk and active cultures - I used Fage Greek yogurt from the store but some people order starter online)
Put the milk into the Instant Pot insert, put the insert into the Instant Pot, and close the lid. If you use the regular lid, it doesn't matter whether it is sealed or vented. You can use a glass lid instead if you have one.
Select the Yogurt program. Press the Yogurt button repeatedly to select the "More" mode. After about 10 seconds, the cooker will beep 3 times and the display will say "boiL."
When that step is done, the cooker will beep and the display will say "Yogt." Check the temperature with a thermometer. It will probably be around 165 degrees. You really want it to reach 180 degrees, so turn on the "Saute" function, and periodically whisk it and check the temperature until it reads 180 degrees. Keep it at 180 degrees for 3 to 5 minutes, then push the "Cancel" button. If a skin forms on the top of the milk at any time during this entire process, remove it and throw it away. It won't hurt anything, but if you let it remain, it will make the yogurt's texture a little weird.
Remove the insert and place it in the sink with cold water or on a wire rack to cool. This shouldn't take long! Keep whisking and checking the temperature. You are looking for 115 to 118 degrees.
When you're at the right temperature, take about 1/2 cup of the heated milk and put it in a small bowl. Add your starter and whisk it together (this is called tempering the starter), then add it back to the rest of the heated milk and whisk to mix well.
Place the insert back into the cooker and close the lid. Again, the steam release valve can be set for either venting or sealing, or use a glass lid. Select the "Yogurt" program and adjust to Normal mode. Press the +/- to set the fermentation time to 8:00 (8 hours). You may want to check it at 4 hours, just in case it goes crazy and ferments quicker!
When the program is finished, the cooker will beep and the display will say "Yogt." To check whether it's truly finished, nudge the cooker slightly to see whether the yogurt has set. DO NOT STIR THE YOGURT AT THIS POINT!!! It should jiggle slightly as a mass, sort of like soft gelatin. There will probably be some whey (clear liquid) on top. If it hasn't set, repeat the previous step, but set the time for 4 hours, and check it every hour.
When the yogurt is set, press "Cancel," remove the insert, cover it with plastic wrap or the glass lid, and refrigerate it for at least 6 hours before you stir it. At the end of that time, you can put it into a storage container. I poured the whey off the top first and didn't strain it. It was creamy and thick.

Reserve 1/4 cup of the yogurt or whey as starter for your next batch!
To eat, I added a tablespoon of raspberry preserves to about 3/4 cup of yogurt. I didn't have any fresh fruit to add, so I made do with that.
AFTERTHOUGHTS: Next time I make yogurt, I MAY use 2% milk instead. And fresher milk, too, for sure. I also MAY strain it for a short time to make it a bit thicker, but other than those two things, I wouldn't change anything. It really did come out well, and I was impressed by my first attempt. I had eight 8-ounce cups of homemade yogurt (which typically comes in 6-ounce cups in the store) for around $2.00 total (about $1.00 for the milk, which I had bought in a gallon container, and about $1.00 for a single-serve cup of Fage plain yogurt). If I had remembered (brain fade!!!) to reserve some of my yogurt to use as starter for my next batch, the cost for that new batch would only be about $1.00, since I wouldn't need to buy anything to use as starter.
Subscribe to:
Posts (Atom)